
How to Record Attendance by Seating Chart
If a seating chart has not been defined, the students will display alphabetically. The students will display in 5 columns and as many rows as necessary to display the applicable students for the specified date. If a seating chart has been defined, the students will display as defined by the seating chart. To view documentation on How to Define your Seating Chart, click here. You can record attendance for any student in the selected period regardless of what Section you are working in. If you teach more than one Section per period, recording attendance by Period allows you to record attendance for all students in the selected period without having to go Section to Section to record attendance.
To access Attendance by Seating Chart, click the Attendance Quick Access Button on the Navigation Bar.
The Attendance Page will appear.
Verify the Seating Chart Radio Button is
selected under View Type. 
Note: Once you have recorded attendance by seating chart, the Application will save this view for the next time you log in to record attendance.
Input specifications are as follows:
Date: Use the Drop Down Calendar Box or type to enter the date. The application defaults to the current date.
Note: If there is no attendance to record, click the ![]() Button. If an instructor teaches multiple sections in the same period,
all sections for that period will be marked as recorded.
Button. If an instructor teaches multiple sections in the same period,
all sections for that period will be marked as recorded.
Absent Code: Use the Drop Down List Box to enter the Attendance Code for which you would like to record attendance.
Note: The application defaults the Absent Code according to what has been set for your site by the Site Administrator.
Tardy Code: Use the Drop Down List Box to enter the Tardy Code for which you would like to record attendance.
Note: The application defaults the Tardy Code according to what has been set for your site by the Site Administrator.
Note: If the Instructor has been assigned the right to record an activity absence/tardy or excused absence/tardy, the Activity Absence/Tardy Code or Excused Absence/Tardy Code will display in the Drop Down List Box.
Period Slider: Select the Period for which you would like to record attendance. The Period selected is highlighted by a black box.
![]()
Note: If an Instructor teaches multiple sections in the same period, the students from all sections in that period for the selected school year and session will be displayed together.
To begin recording attendance:
Click the appropriate Attendance Button
beside the student's name. ![]()
If you would like to record an absence according to the Absent Code selected, click the A Button.
If you would like to record a tardy according to the Tardy Code selected, click the T Button.
If your school district allows you to record an Activity Absence, an E Button will display. To record the Activity Absence for a student, click the E Button.
Note: If the student is present, no action is required.
After you have recorded attendance for a student, the Absent Code/Tardy Code will display in red under the student's picture.
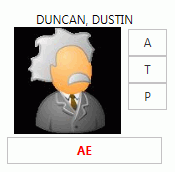
Note: The "P" will appear only if the Instructor has been given over-ride privileges by the SI Administrator. If you have attendance override privileges and have mistakenly recorded an absence or tardy for a student, click the P Button to change the student's attendance to present.
When an absence is recorded for the student, if the student is enrolled in a multi-period section, the absence will be recorded from the recording period forward. For example, if the section is taught in periods 1, 2 and 3, and the instructor is recording attendance in period 1, the absence will be recorded for periods 1, 2 and 3. If the section is taught in periods 1, 2 and 3, and the instructor is recording attendance in period 2, the absence will be recorded for periods 2 and 3.
When a tardy is recorded for the student, if the student is enrolled in a multi-period section, the tardy will ONLY be recorded for the recording period.
Once you have begun recording attendance for a period, a check mark
will display next to the period in the Period Slider. ![]()
If you notice attendance appears for a student, but there is no check mark by that period, this is because that student's attendance was recorded in i-SI by Attendance Personnel or an Administrator. Therefore, the check mark will not appear next to that period because attendance was not recorded by the Instructor for that period.
NOTE: Comments are read-only for Instructors as they are added by Attendance Personnel or Administrators only.