
First, access the Lesson Plans, by clicking the Lesson Plans Quick Access Button on the Navigation Bar.
Note: If all Sections are assigned to a Section Group, the Application will automatically take you to the Manage Lesson Plans Tab.
The Lesson Plan Page will appear.
Use the Section Slider to select the Section for which you want to add the Assignment.

Select the Lesson Plan for which you want to add the Assignment. The selected Lesson Plan is highlighted in blue.
Then, click the Assignments Tab.

The Assignments Tab will appear.
To add a new Assignment, click  next to the All Section Assignments
Header.
next to the All Section Assignments
Header.
The Assignment Form will appear.
Input specifications are as follows:
Lesson Plan: Use the Drop Down List Box to select the Lesson Plan to which you would like to add the assignment.
Another Assignment Form will appear.
Input specifications are as follows:
Title: Enter a Title for the Assignment.
Possible Points: Enter the Possible Points for the Assignment.
Assignment Type: Use the Drop Down List Box to enter the Assignment Type.
Score Multiplier: Enter the Score Multiplier. This is how many times you would like the score for this Assignment to be used when the students' grades are calculated.
Include in Average Check Box: Check the Check Box if you want this Assignment to be included in the students' grade calculations.
Display Order: The Application defaults the Display Order for you to the next successive number. However, you can change the Display Order if you would like.
Use the 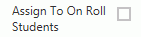 Check Box if
you would like to attach the assignment to all on roll students. If you
enter the Assignment but do not check the check box, you may attach the
Assignment to all students or specific students when you record scores.
See: How to Record Scores to view
documentation on attaching the assignment.
Check Box if
you would like to attach the assignment to all on roll students. If you
enter the Assignment but do not check the check box, you may attach the
Assignment to all students or specific students when you record scores.
See: How to Record Scores to view
documentation on attaching the assignment.
Objective
Standards: If you would like to load the Objective Standards
from i-SI, click  . Then you
can attach the Objective Standards to the Assignment.
. Then you
can attach the Objective Standards to the Assignment.
To view
the specific Objective Standards for the Section, click  to
expand the Objective Standards List.
to
expand the Objective Standards List.
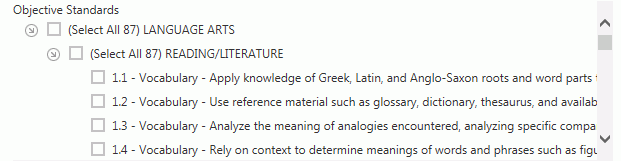
If you check the Objective Standards Check Box, all of the Objective Standards will be connected to this Assignment.
If you would like to only connect specific Objective Standards to this Assignment, check the Check Box next to that specific Standard.
Click  to minimize the
Objective Standards List.
to minimize the
Objective Standards List.
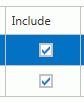
The Assignment may be shared by all Sections included in the Section Group or just specific Sections.
If there is a Section in the Section Group you do NOT want to connect to the Assignment, un-check the Include Check Box next to that Section.
Enter an Assigned Date and Due Date for the Assignment. The Assigned Date is the date you would like to assign the Assignment.
The Due Date is the date the Assignment is due.
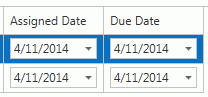
Click
 if you would
like to set the dates for the other Sections that have the same date range
(in the same Sessions), as the selected Section.
if you would
like to set the dates for the other Sections that have the same date range
(in the same Sessions), as the selected Section.
Description: Enter a Description for the Assignment.
You have the option to change the appearance of the Assignment description or add a link/email using the Text Editor. Note: A document or photo may be added only if you have it stored on the Cloud or another site such as GoogleDocs or DropBox.
Click  .
.
To add the saved assignment to Google Classroom:
Select the Assignment from the Assignments Grid. The selected Assignment is highlighted in blue.
Then, click  .
.
A confirmation form will appear with the
Assignment listed. Verify the Assignment, and then click .