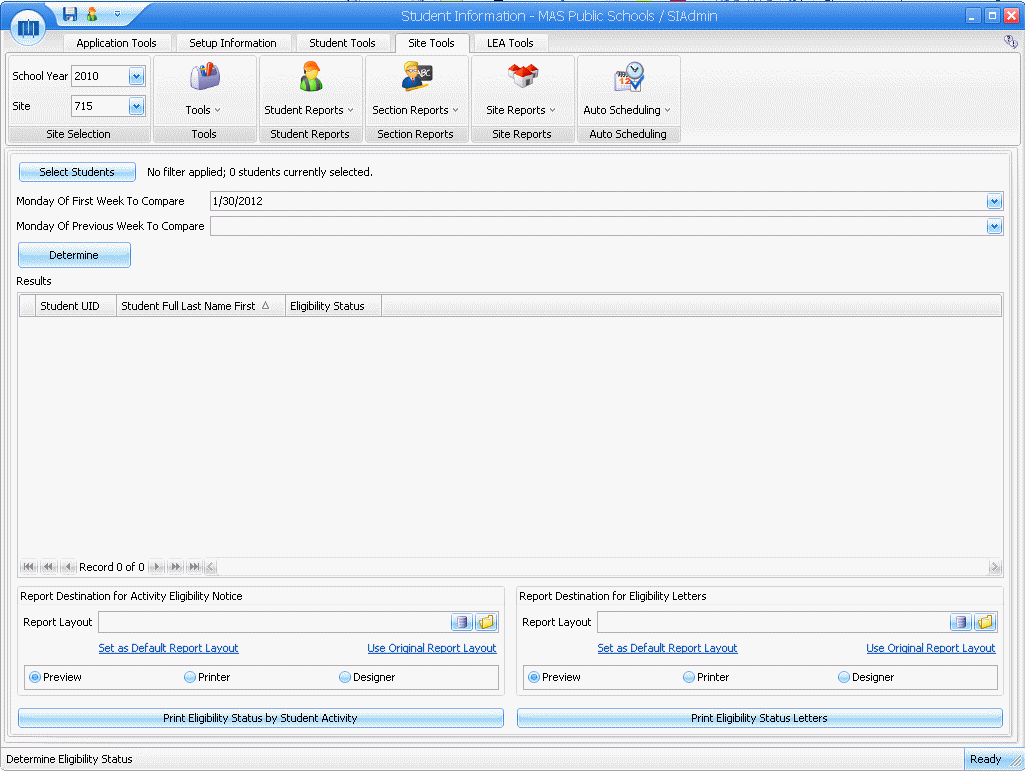
The Determine Eligibility Status Tool allows you to determine eligibility status for a group of selected students.
From the i-SI Main Form, click the Site Tools Ribbon Page, Tools Menu, Determine Eligibility Status.

Click the ![]() Button.
To view documentation for the Student Selector, click
here.
Button.
To view documentation for the Student Selector, click
here.
Monday of First Week to Compare: Use the Drop Down Calendar Box to enter the Monday of the first week you want the system to use for determining the eligibility status.
Monday of Previous Week to Compare: Use the Drop Down Calendar Box to enter the Monday of the previous week you want the system to use for determining the eligibility status.
Click the ![]() Button
Button
Select the destination for the report. Click the ![]() Button to print a report.
Button to print a report.
Note: The students must be associated with an activity for the report to be correct.
Click the ![]() Button to print
the eligibility status letters.
Button to print
the eligibility status letters.
To print a default report layout:
Verify a report layout is NOT selected in the Report Layout of the Report Destination Control. (If a Report Layout is selected, click the Use Original Report Layout link.)
Select Preview or Printer as the report destination.
Print the report.
To print a previously saved report layout:
Select
the report layout in the Report Layout of the Report Destination
control. To select a previously saved report layout from the database,
click the ![]() Button. To
print a previously saved report layout from a file, click the
Button. To
print a previously saved report layout from a file, click the
![]() Button.
Button.
Select Preview or Printer as the report destination.
Print the report.
To design the default report layout:
Verify a report layout is NOT selected in the Report Layout of the Report Destination Control. (If a Report Layout is selected, click the Use Original Report Layout link.)
Select Designer as the report destination.
Print the report.
When you save the report layout or close the Report Designer:
If you ARE assigned the SIAdministrator Role, a dialog will appear allowing you to save the report layout to a file or to the database.
If you ARE NOT assigned the SIAdministrator Role, you can save the report layout to a file.
To design a previously saved report layout:
Select
the report layout in the Report Layout of the Report Destination
control. To select a previously saved report layout from the database,
click the ![]() Button. To
print a previously saved report layout from a file, click the
Button. To
print a previously saved report layout from a file, click the
![]() Button.
Button.
Select Designer as the report destination.
Print the report.
When you save the report layout or close the Report Designer:
If you ARE assigned the SIAdministrator Role, a dialog will appear allowing you to save the report layout to a file or to the database.
If you ARE NOT assigned the SIAdministrator Role, you can save the report layout to a file.
To set a report layout as your default report layout:
Select
the report layout in the Report Layout of the Report Destination
control. To select a previously saved report layout from the database,
click the ![]() Button. To
print a previously saved report layout from a file, click the
Button. To
print a previously saved report layout from a file, click the
![]() Button.
Button.
Click the Set as Default Report Layout link.
To revert back to the original report layout, click the Use Original Report Layout link.
To delete a database report layout:
Click
the ![]() Button.
Button.
Select the report layout from the list of database report layouts.
Click the Delete Report Layout Button.
Note: Only those assigned the SIAdministrator Role are allowed to delete a database report layout.
To delete a file report layout, delete the file from the file system.
After you print the Eligibility Letters, you will have the option to save the Eligibility Determination Results. Once saved, the results can be viewed in the Student/Notifications folder.
Note: You must run the Eligibility Letters to have the option to save the Notification. Therefore, if you have to re-determine Eligibility because of a change in an Assignment Score, you must re-print the Eligibility Letter so that the Notification can be updated to reflect the new Eligibility Status.