The Data Grids contained in the Lunch Room System contain several features within them that allow you to manipulate the data according to your specifications.
Ordering/Sorting
You can order the records from greatest value to least value or vice versa by clicking the Column Headers. For example, if you are working in the Accounts View/Students Tab and would like to view the Student Account Records according to name order, click the FullLastNameFirst Header and the application will order the records from least value to greatest value. If you would like to view the Student Account Records from greatest value to least value, simply click the FullLastNameFirst Header again. If you would like to view the Student Account Records according to grade, simply click the GradeUID Header to order the records from least value to greatest value and to view the Student Account Records from greatest value to least value simply click the GradeUID Header again.

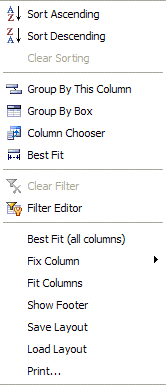
Or, you can right-click in the Column Header to display the Grid Features Menu and select Sort Ascending or Sort Descending.

Grouping
Group by this column groups the data into the value of that header. For example, if you want to view the FullLastNameFirst Column as a group in the Accounts View/Students Tab, click in the FullLastNameFirst Header and drag the Column Header to the top of the grid. Click the ![]() to display the other data pertaining to the record. To ungroup the column, click and drag the Column Header back to the grid where you want the column to display.
to display the other data pertaining to the record. To ungroup the column, click and drag the Column Header back to the grid where you want the column to display.
To group the columns by multiple levels, click the Column Header you would like to display first and drag it to the top of the grid. Then, click and drag the second Column Header beside the first.
Column chooser allows you to customize the columns that display in the grid. You can either add or remove columns within the grid. To add columns to the grid, right-click in a Column Header within the grid and select 'column chooser'. A Customization Box will then appear that displays the other Column Headers that can display as columns within the grid you are working. Click and drag the Column Header you would like to display to the location you would like it to display. To remove a column, right-click in a Column Header within the grid and select 'column chooser'. The Customization Box will then appear. Click and drag the Column Header you would like to remove from the grid to the Customization Box.
The Filter allows you to limit the records displayed in the Data Grid.
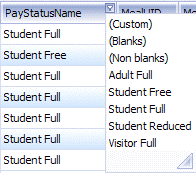
For example, if you are working in the Meals/Orders View and would like to view the records with the Pay Status Student Full, use your mouse to move the arrow to the Pay Status Name Header to display the Filter Button. 
Click the Button to display the Drop Down List.

Select the Pay Status Student Full from the list and only the records with a Pay Status=Student Full will display.
You can also customize the filter. From the Column Header you would like to filter, click the Drop Down List Box and select Custom.
Input Specifications are as follows:
Equals: If this option is selected, the filter will be applied to the records that match exactly what is typed in the value field. The filter is not case-sensitive.
Blanks: If this option is selected, the filter will be applied to the records that have fields with blanks in them.
Like: If this option is selected, the filter will find any record that matches the value typed in the value field. For example, if you would like to view records for any student with the Last Name starting with 'Th', enter '%Th' in the value field. The filter is not case-sensitive.
Enter the value of the field for which you are filtering and then click the ![]() Button. To undo the filter, click the Column Header and select 'All' from the Drop Down List Box.
Button. To undo the filter, click the Column Header and select 'All' from the Drop Down List Box.
Once you exit out of the system, the grids will return to the default settings. However, you may save the layout according to how you have filtered/ordered the data and then load it when you return to work with the grid again. To save the layout once you have edited the grid to your specifications, right-click in a Column Header and select 'Save Layout'. A Save As Box will appear. Enter the Layout Name and click the OK Button. To load the Layout you have saved, right-click in a Column Header and select 'Load Layout'. Use the Drop Down List Box to select the name and then click the OK Button.